
A properly fitted, certified bike helmet can reduce the risk of serious head injury by up to 85% — but only when worn correctly, every single time. This guide covers everything parents need to know about bike helmet safety for kids: how to get the right fit, which safety standards actually matter, when to replace a helmet, and how to make helmet-wearing a non-negotiable habit.
📋 In This Guide
Why Bike Helmets Are Critical for Kids
Head injuries are the leading cause of cycling fatalities and serious disabilities among children. The numbers from the National Highway Traffic Safety Administration are stark: helmets reduce the risk of head injury by up to 85% and brain injury by up to 88%. For children, whose skulls are thinner and whose brains are still developing, this protection is even more vital than it is for adults.
Most childhood cycling accidents happen close to home — in driveways, on quiet streets, and on familiar bike paths. Speed is rarely the factor. Falls at low speed onto hard surfaces are the most common cause of head injury, which means no ride is too short or too casual to skip the helmet.
⚠️ Key Risk Facts:
- Bicycle crashes are the leading cause of sports-related head injuries in children
- Children aged 5–14 account for the majority of bike-related emergency room visits each year
- Up to 88% of brain injuries in cycling accidents could be prevented with a correctly fitted helmet
- Most serious accidents happen within a mile of home — no ride is too short to skip protection
The critical caveat: these injury-reduction rates only apply when a helmet fits correctly and is fastened properly. A loose helmet, a tilted helmet, or an undone chin strap provides a fraction of its rated protection — and can create a dangerous false sense of security. That’s why fit is the single most important factor in this guide.
How a Kids Bike Helmet Should Fit: Step-by-Step
Even a top-rated, CPSC-certified helmet will fail to protect your child if it doesn’t fit correctly. The good news: checking for proper fit takes under two minutes once you know what to look for.
Step 1 — The 2-2-2 Fit Rule (Eyes, Ears, Mouth)
The 2-2-2 rule is the gold-standard framework recommended by the American Academy of Pediatrics. Check all three points after placing the helmet on your child’s head:
The helmet should sit 2 finger-widths above the eyebrows — low on the forehead, not pushed back.
Straps should form a V-shape just below each ear. No V = strap adjustment needed.
You should be able to fit 2 fingers between the chin strap and chin. One finger = too tight. Three = too loose.
Step 2 — Check Helmet Position (Forehead Coverage)
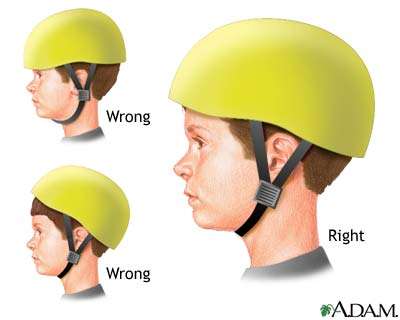
The most common helmet mistake — among children and adults alike — is wearing the helmet tilted back on the head. A correctly positioned helmet should:
- Sit level on the head — not angled back toward the crown
- Cover the forehead — at least two finger-widths above the eyebrows
- Leave approximately 1–2 cm of forehead visible between the helmet rim and the eyebrows
Step 3 — Strap Adjustment (The Y-Shape)
Strap positioning is the most commonly neglected part of helmet fitting. Follow these steps to get it right:
- Put the helmet on and fasten the chin buckle
- Slide the side strap adjusters so the two straps meet in a V-shape just below the ear lobe — not behind the ear or on the cheek
- Tighten the chin strap until snug — you should be able to fit one to two fingers under the strap, but no more
- Ask your child to open their mouth wide — the helmet should press down slightly if correctly tensioned
Step 4 — The Shake Test
Once the helmet is fitted and strapped, ask your child to shake their head from side to side and forward and back. The helmet should move with their head, not independently of it. If the helmet rocks or slides, the fit system needs further tightening.
“A properly fitted helmet should be snug but comfortable, with no pressure points. When your child shakes their head, the helmet shouldn’t move independently.” — American Academy of Pediatrics
Interactive Helmet Fit Checker
Use the tool below to check your current helmet or get a size and type recommendation for a new one:
🪖 Kids Helmet Fit & Size Tool
Check your current helmet’s fit — or find the right size for a new one
Check each point on your current helmet:
How to Choose the Right Helmet Size for Your Child
Measuring Head Circumference
Head circumference — not age — is the most reliable way to size a helmet. Use a soft fabric measuring tape:
- Wrap the tape around the largest part of the head — about 1 inch (2.5 cm) above the eyebrows
- Keep the tape level all the way around
- Record the measurement in centimetres — this is your baseline size
- Measure twice for accuracy, as heads aren’t perfectly circular
No tape measure? A piece of string and a ruler work just as well. Children’s heads grow quickly — remeasure before each new helmet purchase, even if you bought one recently.
Kids Helmet Size Chart by Age and Circumference
| Size | Head Circumference | Typical Age Range | Notes |
|---|---|---|---|
| XS | 44–48 cm | 12–24 months | Toddler / balance bike riders |
| S | 48–52 cm | 2–5 years | Many 3–5 year olds; confirm with tape |
| M | 52–56 cm | 5–9 years | Most common school-age size |
| L | 56–60 cm | 9–14 years | Older children and smaller adults |
| XL | 60+ cm | Teen / Adult | Transition to adult sizing |
Important: these are guidelines, not guarantees. Size labels vary between manufacturers — always consult the specific brand’s sizing chart and try the helmet before purchasing where possible. See our complete kids bike helmet guide for brand-specific size advice.
Fit vs Comfort vs Safety: Getting the Balance Right
A common mistake is prioritising comfort over safety when fitting. The right balance works like this: the helmet should feel snug — not painful — with no pressure points. If your child says it hurts, first try adjusting the fit system before assuming the helmet is the wrong size. Many helmets include swappable padding kits that allow customisation for awkward head shapes.
Conversely, never buy a helmet that’s “room to grow” — a loose helmet won’t stay in position during a crash. If your child is between sizes, always size down and use padding inserts.
Bike Helmet Safety Standards Explained
Before anything else — colour, style, brand, price — check the certification label. A helmet without the correct certification has not been tested to protect your child in a crash.
CPSC (USA) — The Baseline Requirement
The Consumer Product Safety Commission (CPSC) standard is mandatory for all bicycle helmets sold in the United States since 1999. Every helmet you buy in the US must carry this certification — if it doesn’t display the CPSC label, do not buy it. CPSC testing covers impact absorption, strap strength, and retention system performance.
EN1078 (Europe) — The European Standard
EN1078 is the European equivalent of CPSC certification, covering helmets for cyclists and skateboard riders. It tests impact attenuation, strap performance, and roll-off resistance. If you’re buying a helmet in the UK or EU, this is the label to look for. Many premium brands carry both CPSC and EN1078 certification.
EN1080 — For Very Young Children (Under 5)
EN1080 is a specialist European standard specifically designed for young children’s helmets, addressing a risk unique to small riders: the chin strap becoming a strangulation hazard. EN1080-certified helmets use a quick-release mechanism that opens under a defined load, preventing neck constriction if a child’s helmet becomes caught on an object. For children under 5, look for this certification in addition to EN1078.
ASTM Standards — For Specific Riding Styles
Beyond the baseline certifications, activity-specific ASTM standards provide additional protection for more demanding riding:
- ASTM F1952 — Downhill mountain biking helmets
- ASTM F2032 — BMX helmets
- ASTM F1492 — Skateboard helmets (relevant for multi-sport helmets)
MIPS, WaveCel and Rotational Protection Systems
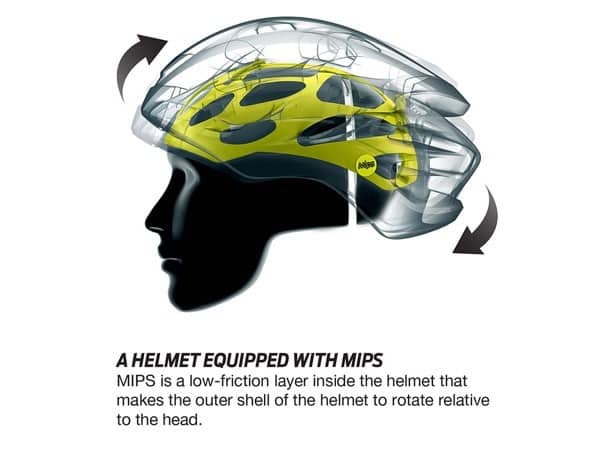
MIPS (Multi-directional Impact Protection System) is not a certification but a safety technology. Many real-world impacts are angled rather than direct — MIPS addresses this by adding a low-friction slip layer inside the helmet that can move 10–15mm in all directions, redirecting rotational energy away from the brain. Studies suggest MIPS can reduce rotational forces by up to 50% in angled impacts. It adds $20–50 to helmet cost and is increasingly standard in mid-range and premium children’s helmets.
WaveCel (used by Trek/Bontrager) and SPIN (POC) are proprietary alternatives that take a similar approach to rotational energy management, typically at a higher price premium. All three are meaningful safety upgrades for active riders.
| Technology | Protection | Cost Premium | Best For |
|---|---|---|---|
| Standard (no add-on) | Direct impacts ✓ | Base price | Casual, infrequent riders |
| MIPS | Direct + rotational ✓✓ | +$20–50 | Frequent riders, trail riding |
| WaveCel / SPIN | Direct + rotational ✓✓✓ | +$50–100 | Aggressive riders, mountain biking |
How to Check Certification Labels
Certification stickers are typically located on the inside of the helmet shell or on a hang tag. Look for the specific standard code (CPSC, EN1078, ASTM) followed by the year of the standard version. If purchasing online, the product listing should explicitly state which certifications are met — if it doesn’t, contact the seller before buying.
🚩 Red Flags: Do Not Buy This Helmet If…
- No certification label is visible anywhere on the helmet
- It’s described as “novelty”, “decorative”, or “costume” headgear
- The price is under $10 for a new helmet (impossible to meet standards at this price point)
- It’s a second-hand helmet of unknown history
- There are visible cracks, dents, or compressed foam areas
When to Replace a Kids Bike Helmet
Helmet foam is designed to crush during an impact — that’s how it absorbs energy. Once crushed, it cannot be restored. This means most bike helmets are single-use safety devices in the context of crashes. Understanding when to replace is as important as choosing the right helmet in the first place.
Replace Immediately After Any Significant Impact
If your child has a crash where the helmet contacts a hard surface — road, pavement, a kerb, another bike — replace the helmet before their next ride, even if there is no visible damage. Internal foam compression is invisible to the naked eye. The same rule applies if the helmet is dropped from more than about 3 feet onto a hard floor.
Replace Every 3–5 Years (Even Without a Crash)
EPS foam (the energy-absorbing material inside most helmets) degrades over time through exposure to UV light, sweat, heat, and general compression from repeated use. Most manufacturers recommend replacing helmets every 3–5 years regardless of apparent condition. Check the manufacture date, which is usually stamped inside the helmet near the size label.
Other Replacement Triggers
- Head growth — children typically need a new size every 2–3 years
- Strap damage — frayed straps, broken buckles, or failed adjusters compromise safety
- Shell cracks or dents — any visible damage means the structural integrity is compromised
- Padding deterioration — flattened or worn padding changes the fit and can create pressure points
- Fit adjustment exhausted — if the dial system can no longer achieve a snug fit, the helmet is too big
🚨 Safety Alert: Never buy second-hand helmets for children. You cannot verify whether a used helmet has been in an undisclosed crash. The minimal saving is not worth the risk.
Common Helmet Mistakes Parents Make
Even well-meaning parents regularly make helmet fitting mistakes that reduce protection. Here are the most frequently seen errors — and how to fix them:
The most common error. When the helmet tips back, the forehead — the most frequently impacted area — is completely unprotected. The helmet should be level, sitting low on the forehead, every time.
A dangling or unfastened chin strap allows the helmet to slide or fall off on impact. Many parents fastened the strap loosely to avoid complaints — the strap should allow only 1–2 fingers’ width, not a fist.
A loose helmet won’t stay in position during a fall. Always fit for today, not next year. Buy the correct size and replace it when the child grows out of it.
“It looks fine” is not a reliable assessment. Internal foam damage is invisible. Replace any helmet that has taken an impact before the next ride.
Skateboard helmets, horse riding helmets, and football helmets are engineered for different impact scenarios. Only a CPSC or EN1078-certified bike helmet should be used for cycling.
A thick beanie under a correctly-fitted helmet changes the fit geometry entirely. Either use a helmet liner designed for that helmet, or choose a winter-specific helmet with insulation built in.
Features That Actually Improve Safety
Shell Construction: In-Mold vs Hard Shell
In-mold construction (also called “fused” or “microshell”) bonds the polycarbonate outer shell directly to the EPS foam liner during manufacturing. This creates a stiffer, lighter, and better-ventilated helmet that is the standard for most mid-range and premium helmets. Hard-shell helmets use a separate plastic shell fitted over the foam and are more durable under repeated minor impacts — they’re common in multi-sport helmets used for skateboarding and BMX. Neither is universally safer; choose based on riding style.
Helmet Coverage: How Much Protection Does Your Child Need?
More coverage means more protection — but also more weight and heat. Match coverage to riding style:
- Standard recreational helmets — cover the top and sides of the head. Lightweight and well-ventilated. Ideal for neighbourhood and path riding.
- Mountain bike helmets — extend further down the back of the head and feature a visor. Best for trail and off-road riding where rearward falls are common.
- Full-face helmets — cover chin and jaw in addition to the skull. Essential for BMX, downhill riding, and bike parks.
- Multi-sport helmets — flatter shape with more rear coverage. Suitable for combined bike and scooter use. See our guide to the best kids scooters for scooter-specific recommendations.
Visibility Features
Helmets contribute to visibility as well as impact protection. When selecting a helmet, consider:
- Bright or neon colours — significantly more visible to drivers in daylight than dark colours
- Integrated reflective elements — critical for dawn, dusk, and low-light riding
- LED rear lights — some premium helmets include rechargeable integrated lighting
Buckle Types: Pinch-Free and Magnetic Systems
The chin buckle is the most-touched part of a children’s helmet — and poorly designed buckles are one of the top reasons children resist wearing their helmets. Here’s what to look for:
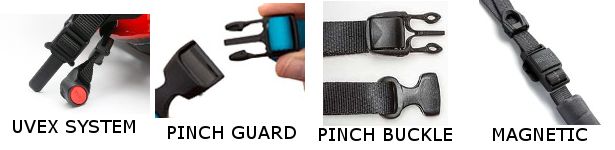
- Standard buckles — functional but can pinch skin during fastening, especially with children
- Pinch-free buckles — use a plastic guard to prevent skin being caught. A worthwhile upgrade for young children
- Magnetic buckles (Lazer, Nutcase, Melon) — snap together with one hand, eliminate pinching entirely. Especially useful for younger children who fasten their own helmet
- Proprietary systems (Uvex) — brand-specific designs that address pinching through unique mechanisms
Ventilation and Weight
A heavy or hot helmet increases the chance your child will complain about wearing it. For children under 6 whose neck muscles are still developing, choose the lightest helmet that provides appropriate coverage — typically 200–300g for recreational use. More vents improve airflow but slightly reduce structural integrity; for high-speed or impact-prone riding, fewer, larger vents in a stiffer shell are preferable.
How to Get Kids to Actually Wear Their Helmet
The best helmet in the world provides zero protection in a bag. Getting children to wear helmets consistently — without a battle every time — is a genuine parenting challenge with proven solutions.
Involve Them in the Choice
Children who choose their own helmet are significantly more likely to wear it willingly. Narrow the selection to two or three parent-approved options that meet safety requirements, then let your child decide. Colour, graphics, and style matter enormously to children — let these influence the final decision. Many parents find that customising a helmet with stickers dramatically increases buy-in.
Lead by Example
Children whose parents consistently wear helmets are significantly more likely to wear their own without complaint. Make it a family rule: no rider — adult or child — goes out without their helmet fastened. Seeing parents wearing helmets removes the “only kids have to do it” objection entirely. Check out our guide to cool adult bike helmets if you need an upgrade yourself.
Address Common Complaints Directly
- “It’s uncomfortable” — review the fit; an uncomfortable helmet is usually a poorly fitted one. Try a different model or padding configuration.
- “It’s too hot” — choose a helmet with more vents, or look at helmets with active cooling channels
- “It looks stupid” — find designs that match their interests. Let them add stickers. Most brands now offer genuinely attractive designs for children.
- “None of my friends wear one” — connect with other cycling families who share helmet values. Arrange group rides where everyone wears helmets.
- “It pinches me” — upgrade to a magnetic or pinch-free buckle model
Build the Habit Early
Children who wear helmets on their very first ride — on a balance bike or tricycle — rarely resist them later. The longer a child rides without a helmet, the harder the habit is to establish. Start on day one and treat it as completely non-negotiable, just like a seatbelt.
Additional Bike Safety Tips for Kids
A helmet is essential — but it’s one part of a broader safety approach. Pair proper equipment with good habits and education.
- High-visibility clothing — bright or reflective gear makes children visible to drivers in all light conditions
- Knee and elbow pads — particularly valuable for beginners and young children still developing balance. See our guide to kids bike accessories for top picks.
- Bike lights — front and rear lights are essential if riding in any low-light conditions
- Well-maintained bike — regularly check brakes, tyres, and handlebars. A child should be able to stop predictably every time.
- Traffic education — teach hand signals, road positioning, and basic road rules before they ride anywhere near traffic
- Skills practice — empty car parks are excellent for developing braking, turning, and obstacle avoidance before riding on roads
Quick Bike Helmet Safety Checklist
Before every ride, run through this checklist. It takes 30 seconds:
✅ Pre-Ride Helmet Checklist
Best Kids Bike Helmets: Our Top Picks
With the safety foundations covered, here are our top-tested recommendations across budget ranges. Every helmet below is CPSC-certified and available with key safety features discussed in this guide. For a fuller breakdown of every model, see our complete best kids bike helmets guide.
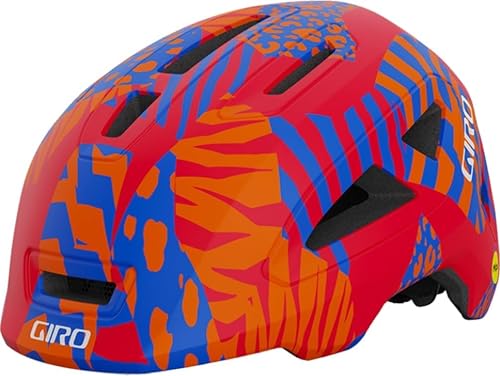
🥇 Best Premium Pick: Giro Scamp II MIPS
The Giro Scamp II MIPS is our top recommendation for parents who want the best protection available. Designed from the ground up for young riders, it includes MIPS technology, Giro’s Roc Loc Jr. dial-fit system, a pinch-guard buckle, and 8 vents for airflow. CPSC-certified and available in sizes from XS (45–49 cm) upwards, it covers children from balance-bike stage through to about age 8.
 Check price at Amazon
- ✅ MIPS rotational protection included
- ✅ Roc Loc Jr. dial fit system for precision adjustment
- ✅ CPSC certified; extended head protection standard
- ✅ Pinch-guard buckle
- ✅ Sizes: XS (45–49 cm) through S and M
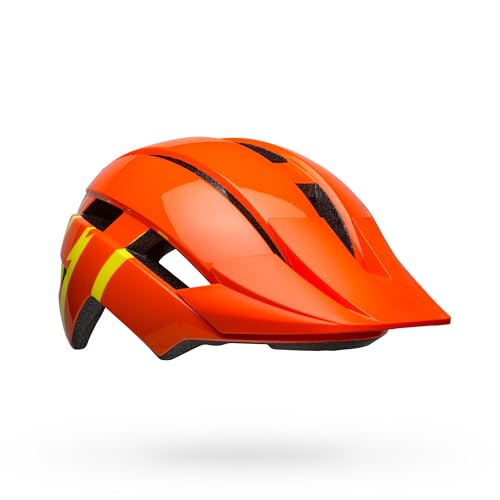
🥈 Best All-Round Pick: Bell Sidetrack II MIPS
Bell’s Sidetrack II is a consistently strong performer with excellent all-mountain rear coverage, MIPS technology on the youth version, and Bell’s Ergo Fit dial system. It features 14–15 vents and a snap-in visor. Particularly well-suited to children aged 5–12 who ride a mix of paths and light trails.
 Check price at Amazon
- ✅ MIPS on youth size (50–57 cm)
- ✅ Extended rear head coverage
- ✅ Ergo Fit dial system — easy for parents to adjust
- ✅ Anti-pinch buckle closure
- ✅ Snap-in visor included
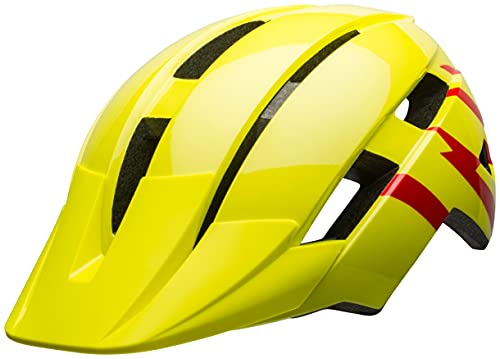
🥉 Best Value Pick: Bell Sidetrack II (Child)
The non-MIPS Sidetrack II for younger children (47–54 cm) brings all of Bell’s key fit and construction quality at a more accessible price point. Excellent choice for children just starting out on bikes or balance bikes, where fall speeds are lower and the core coverage and certifications are the priority.
 Check price at Amazon
- ✅ CPSC certified
- ✅ Fusion in-mold construction
- ✅ Universal Child 47–54 cm
- ✅ Pinch-free buckle
- ⚠️ No MIPS — for casual/slow riding
Looking for more options? Our full kids bike helmet buying guide includes 10+ reviewed models across all price ranges, riding styles, and age groups — including toddler helmets, multi-sport options, and MTB-specific picks. We also cover balance bike sizes if you’re gearing up a young rider from scratch.