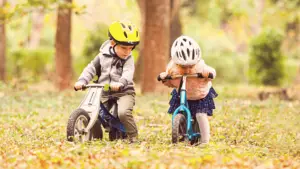
Are you about to buy a new bike for your child but don’t know what size is right? Luckily, some simple steps can help you determine the appropriate bike frame size for your child.
Kids Bike Size Chart
You can use this kid’s bike size chart as a quick reference tool when you are looking for a new bike for your child.
| Wheel Size | Child’s Age (years) | Child’s Height | Inseam |
| 12″ (30 cm) | 2 – 3 | 2’10″ – 3’4″ (85–100 cm) | 14″ – 17″ (33 – 42 cm) |
| 14″ (36 cm) | 3 – 4 | 3’1″ – 3’7″ (95–110 cm) | 16″ – 20″ (40 – 50 cm) |
| 16″ (41 cm) | 4 – 5 | 3’7″ – 4’0″ (110–120 cm) | 18″ – 22″ (45 – 55 cm) |
| 20″ (51 cm) | 5 – 8 | 4’0″ – 4’5″ (120–135 cm) | 22″ – 25″ (55 – 63 cm) |
| 24″ (61 cm) | 8 – 11 | 4’5″ – 4’9″ (135–145 cm) | 24″ – 28″ (60 – 72 cm) |
| 26″ (66 cm) | 10+ | 4’9″+ (145+ cm) | 25″+ (70+ cm) |
Kids Bike Sizes Guide
Below we have a guide on how to measure your child’s height and inseam so that you can use these measurements with the bike size chart to find the right bike size.

How to measure a child’s height
You can determine which bike size would be best for your child by measuring your child’s height. This method is for both children’s balance bikes and pedal bikes.
Here are some simple steps to help you measure the height of your child:
- First, have the child remove any items of clothing that may interfere with getting an accurate height measurement such as shoes, bulky clothing or hair accesories. Also, make sure that their hairstyle doesn’t interfere with the measing eg. high pony tails or braids.
- Find a straight wall and floor to take the measurement. The wall shouldn’t have mouldings so that the child can have their heels against the wall and the floor should be uncarpeted to get an accurate measurement.
- Have the child stand with their back straight against the wall and their feet flat on the floor. Make sure their legs are straight and that their shoulders are level. They should be looking straight ahead with their chin parellel to the floor.
- For the next part you’ll need a ruler or a piece of card or thin wood to place level on the childs head. You’ll want to place the ruler or card on the child’s head at a right angle to the wall.
- You can check if the ruler is straight by by crouching down to the child’s head height. Once the ruler is straight and at a right angle to the wall you can then place a mark on the wall under the ruler with a pencil.
- Once you’ve made the mark on the wall with a pencil you can then have the child move away from the wall. You then measure the child’s height by using a tape measure to measure from the floor to the mark on the wall.
- Write a note of the child’s height so that you can keep it as a reference for later.
How to Measure the child’s inseam
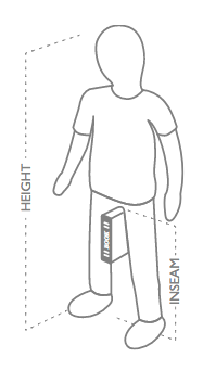
Here are some simple steps to help you measure the inseam of your child:
- With shoes on, have the child stand with their back against a wall.
- Next, place a hardback book between the child’s legs, with the spine towards the crotch.
- Raise the book until the spine of the book is under their crotch.
- Make sure the book is level with the floor and measure from the floor to the spine of the book – this is your child’s inseam measurement!
Bike Size Checklist
Once you have your child’s height and inseam, it is time to find the right size bike. An excellent way to start is by placing a bike on the ground with its seat at the same height as your child’s inseam.
- Once you have the bike on the floor, measure from the middle of its seat to the top of its crossbar.
- Your child should be able to stand over a bike with both feet flat on the floor and their legs slightly bent. It is the best way to tell if a bike will be safe for your child.
If both of these conditions are satisfied, then that particular bike size is a good choice for you and your child!
The “touch the ground” test
In addition to checking if they can stand over the bike, you also need to make sure that your child can touch the ground with their feet when seated on it. It makes sure that your child will not be straining any muscles and causing injury while riding the bike.
Comfort is key
No point riding the bike if you feel like you’re going to fall off or slip up any moment now. The child should be able to place their feet on and off the pedals with ease allowing them to stop for traffic and lights. A lot of bikes have adjustable seats, so make sure you test the seat height before you go and look for another bike.
Do not forget about brakes!
It is vital to make sure that both of your child’s legs are long enough to reach the brakes. Children should easily adjust their brake levers without too much effort – if they cannot do this, then the bike size is wrong.
Handlebar reach
It is also essential to consider how high your child will need to lift their arms to comfortably reach handlebars and brake levers. If they cannot reach them with ease, then it might be time to switch bike sizes!
The American Academy of Pediatrics recommends that kids aged between 5 and 8 years should be able to touch the ground with their feet, while teens should only need an inch or two of clearance.
So there you have it! You can measure your child’s height and find the perfect bike size for them after that! All you need is a few simple measurements, some math skills.
Legroom for pedaling and breaking
One last thing to consider is how much legroom your child will need to pedal and brake. It makes it easier for them to control the bike, which makes their time on it safer!
Also, make sure that your child does not have any trouble turning or steering the bike.
If they cannot do this with ease, you might want to switch up bike measurements until they fit perfectly with their odd shapes!
Make sure there is enough space between the saddle and handlebars to accommodate both feet, especially if one foot will be on a pedal at all times or if you plan to use toe clips or clipless pedals with shoes.
Final words
Please take note of any other physical differences that may affect your decision, such as being short-legged, long-armed, etc., so that you can make an informed choice about which model will offer them the best fit.
So now you know all there is to know about bike size! All you need is some simple measurements and a few math skills – how easy was that? Now make sure that your child’s new bike fits them perfectly so that they can enjoy riding it safely.
Besides this, you should also know about the different types of bicycles to make sure you or your child, or the gift that you’re getting really fits its user.
If you are interested in buying a bike for your child check out our buying guides: